Can You Use Windows Remote Desktop as a Secure Crt Tool?
This browser is no longer supported.
Upgrade to Microsoft Edge to take advantage of the latest features, security updates, and technical support.
Install and utilize the Azure Cosmos DB Emulator for local development and testing
APPLIES TO:  SQL API Cassandra API Gremlin API Tabular array API Azure Cosmos DB API for MongoDB
The Azure Cosmos DB Emulator provides a local environs that emulates the Azure Cosmos DB service for development purposes. Using the Azure Creation DB Emulator, y'all can develop and test your application locally, without creating an Azure subscription or incurring any costs. When you're satisfied with how your application is working in the Azure Cosmos DB Emulator, yous tin switch to using an Azure Cosmos account in the deject. This article describes how to install and utilize the emulator on Windows, Linux, macOS, and Windows docker environments.
Download the emulator
To go started, download and install the latest version of Azure Cosmos DB Emulator on your local computer. The emulator release notes commodity lists all the available versions and the characteristic updates that were made in each release.
![]() Download the Azure Cosmos DB Emulator
Download the Azure Cosmos DB Emulator
You tin develop applications using Azure Cosmos DB Emulator with the SQL, Cassandra, MongoDB, Gremlin, and Table API accounts. Currently the data explorer in the emulator fully supports viewing SQL data only; the data created using MongoDB, Gremlin/Graph and Cassandra client applications it is not viewable at this time. To learn more, run into how to connect to the emulator endpoint from dissimilar APIs.
How does the emulator work?
The Azure Cosmos DB Emulator provides a high-fidelity emulation of the Azure Creation DB service. It supports equivalent functionality as the Azure Cosmos DB, which includes creating data, querying information, provisioning and scaling containers, and executing stored procedures and triggers. You can develop and examination applications using the Azure Cosmos DB Emulator, and deploy them to Azure at global scale by updating the Azure Cosmos DB connection endpoint.
While emulation of the Azure Cosmos DB service is faithful, the emulator's implementation is dissimilar than the service. For example, the emulator uses standard Os components such as the local file system for persistence, and the HTTPS protocol stack for connectivity. Functionality that relies on the Azure infrastructure like global replication, single-digit millisecond latency for reads/writes, and tunable consistency levels are not applicable when you lot use the emulator.
You can migrate data between the Azure Creation DB Emulator and the Azure Creation DB service by using the Azure Cosmos DB Information Migration Tool.
Differences between the emulator and the cloud service
Because the Azure Cosmos DB Emulator provides an emulated environment that runs on the local developer workstation, in that location are some differences in functionality between the emulator and an Azure Cosmos account in the cloud:
-
Currently the Information Explorer pane in the emulator fully supports SQL API clients only. The Data Explorer view and operations for Azure Cosmos DB APIs such as MongoDB, Table, Graph, and Cassandra APIs are not fully supported.
-
The emulator supports only a unmarried fixed account and a well-known main primal. You tin't regenerate cardinal when using the Azure Cosmos DB Emulator, however you can change the default key by using the command-line option.
-
With the emulator, yous can create an Azure Cosmos account in provisioned throughput mode only; currently information technology doesn't support serverless way.
-
The emulator is not a scalable service and it doesn't back up a big number of containers. When using the Azure Cosmos DB Emulator, by default, you can create up to 25 fixed size containers at 400 RU/s (only supported using Azure Creation DB SDKs), or 5 unlimited containers. For more information on how to change this value, come across Set the PartitionCount value commodity.
-
The emulator does not offering unlike Azure Cosmos DB consistency levels like the cloud service does.
-
The emulator does not offering multi-region replication.
-
Because the re-create of your Azure Creation DB Emulator might not ever be upward to date with the most contempo changes in the Azure Creation DB service, y'all should e'er refer to the Azure Cosmos DB capacity planner to accurately estimate the throughput (RUs) needs of your application.
-
The emulator supports a maximum ID property size of 254 characters.
Install the emulator
Before y'all install the emulator, make certain you have the post-obit hardware and software requirements:
-
Software requirements:
- Currently Windows Server 2016, 2022 or Windows 10 host Os are supported. The host Os with Active Directory enabled is currently non supported.
- 64-bit operating organization
-
Minimum hardware requirements:
- 2-GB RAM
- ten-GB available hard deejay space
-
To install, configure, and run the Azure Creation DB Emulator, you lot must have administrative privileges on the computer. The emulator will add a certificate and also set the firewall rules in lodge to run its services. Therefore admin rights are necessary for the emulator to be able to execute such operations.
To become started, download and install the latest version of Azure Cosmos DB Emulator on your local computer. If yous run into any issues when installing the emulator, see the emulator troubleshooting article to debug.
Depending upon your system requirements, you can run the emulator on Windows, Docker for Windows, Linux, or macOS as described in next sections of this article.
Cheque for emulator updates
Each version of emulator comes with a fix of feature updates or bug fixes. To see the available versions, read the emulator release notes commodity.
After installation, if you lot have used the default settings, the data corresponding to the emulator is saved at %LOCALAPPDATA%\CosmosDBEmulator location. You can configure a dissimilar location past using the optional information path settings; that is the /DataPath=PREFERRED_LOCATION as the control-line parameter. The data created in i version of the Azure Cosmos DB Emulator is not guaranteed to exist accessible when using a different version. If you need to persist your data for the long term, it is recommended that y'all store that data in an Azure Cosmos account, instead of the Azure Cosmos DB Emulator.
Employ the emulator on Windows
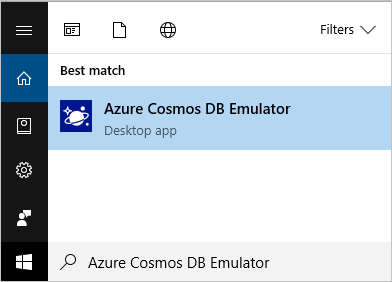
The Azure Cosmos DB Emulator is installed at C:\Programme Files\Azure Cosmos DB Emulator location by default. To start the Azure Creation DB Emulator on Windows, select the Start button or press the Windows key. Begin typing Azure Creation DB Emulator, and select the emulator from the list of applications.
When the emulator has started, you lot'll run into an icon in the Windows taskbar notification area. It automatically opens the Azure Creation data explorer in your browser at this URL https://localhost:8081/_explorer/alphabetize.html URL.

You can also starting time and end the emulator from the command-line or PowerShell commands. For more information, see the command-line tool reference article.
The Azure Cosmos DB Emulator by default runs on the local machine ("localhost") listening on port 8081. The address appears equally https://localhost:8081/_explorer/index.html. If you lot shut the explorer and would like to reopen it later, yous tin either open up the URL in your browser or launch information technology from the Azure Cosmos DB Emulator in the Windows Tray Icon as shown below.

Use the emulator on Linux or macOS
Currently, the Azure Cosmos DB Emulator tin can only be run on Windows. If you are using Linux or macOS, we recommend you use the Linux Emulator (Preview) or run the emulator in a Windows virtual machine hosted in a hypervisor such every bit Parallels or VirtualBox.
Notation
Every time you restart the Windows virtual machine that is hosted in a hypervisor, you take to reimport the certificate because the IP address of the virtual machine changes. Importing the certificate isn't required in case yous accept configured the virtual car to preserve the IP address.
Use the following steps to use the emulator on Linux or macOS environments:
-
Run the following command from the Windows virtual machine and make a notation of the IPv4 address:
ipconfig.exe -
Within your application, change the endpoint URL to use the IPv4 address returned by
ipconfig.exeinstead oflocalhost. -
From the Windows VM, launch the Azure Creation DB Emulator from the command line using the following options. For details on the parameters supported past the command line, run into the emulator command-line tool reference:
Microsoft.Azure.Cosmos.Emulator.exe /AllowNetworkAccess /Cardinal=C2y6yDjf5/R+ob0N8A7Cgv30VRDJIWEHLM+4QDU5DE2nQ9nDuVTqobD4b8mGGyPMbIZnqyMsEcaGQy67XIw/Jw== -
Finally, you need to resolve the certificate trust process between the awarding running on the Linux or Mac environment and the emulator. You can utilize one of the following two options to resolve the certificate:
- Import the emulator TLS/SSL document into the Linux or Mac surround or
- Disable the TLS/SSL validation in the application
Option one: Import the emulator TLS/SSL certificate
The following sections show how to import the emulator TLS/SSL certificate into Linux and macOS environments.
Linux environs
If you are working on Linux, .NET relays on OpenSSL to do the validation:
-
Export the certificate in PFX format. The PFX option is available when choosing to export the individual key.
-
Copy that PFX file into your Linux environment.
-
Convert the PFX file into a CRT file
openssl pkcs12 -in YourPFX.pfx -clcerts -nokeys -out YourCTR.crt -
Copy the CRT file to the folder that contains custom certificates in your Linux distribution. Commonly on Debian distributions, it is located on
/usr/local/share/ca-certificates/.cp YourCTR.crt /usr/local/share/ca-certificates/ -
Update the TLS/SSL certificates, which volition update the
/etc/ssl/certs/folder.update-ca-certificates
macOS environment
Apply the following steps if you are working on Mac:
-
Consign the certificate in PFX format. The PFX choice is bachelor when choosing to consign the individual cardinal.
-
Re-create that PFX file into your Mac environment.
-
Open the Keychain Access application and import the PFX file.
-
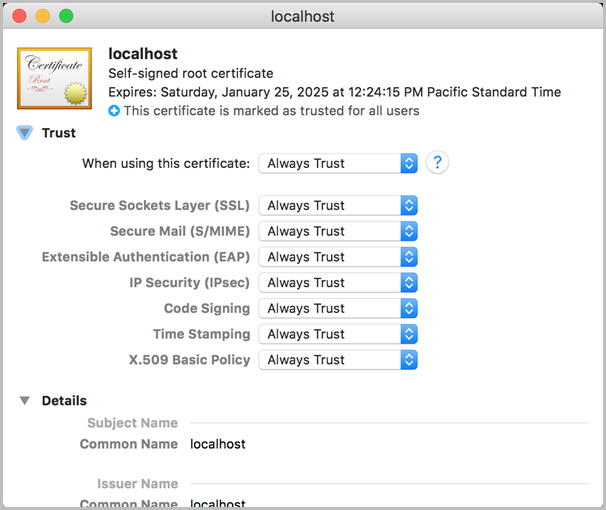
Open the list of Certificates and identify the i with the name
localhost. -
Open the context menu for that particular detail, select Go Item and under Trust > When using this certificate option, select Always Trust.
Pick 2: Disable the SSL validation in the application
Disabling SSL validation is only recommended for development purposes and should not exist done when running in a production environment. The following examples prove how to disable SSL validation for .Cyberspace and Node.js applications.
- .Cyberspace Standard 2.one+
- .Net Standard ii.0
- Node.js
For whatever awarding running in a framework compatible with .NET Standard 2.1 or afterward, we tin leverage the CosmosClientOptions.HttpClientFactory:
CosmosClientOptions cosmosClientOptions = new CosmosClientOptions() { HttpClientFactory = () => { HttpMessageHandler httpMessageHandler = new HttpClientHandler() { ServerCertificateCustomValidationCallback = HttpClientHandler.DangerousAcceptAnyServerCertificateValidator }; return new HttpClient(httpMessageHandler); }, ConnectionMode = ConnectionMode.Gateway }; CosmosClient customer = new CosmosClient(endpoint, authKey, cosmosClientOptions); Enable access to emulator on a local network
If you lot take multiple machines using a single network, and if you prepare the emulator on i machine and desire to admission it from other machine. In such case, you lot need to enable access to the emulator on a local network.
You can run the emulator on a local network. To enable network access, specify the /AllowNetworkAccess option at the command-line, which also requires that yous specify /Key=key_string or /KeyFile=file_name. You lot tin can use /GenKeyFile=file_name to generate a file with a random key upfront. Then you lot can pass that to /KeyFile=file_name or /Key=contents_of_file.
To enable network access for the starting time time, the user should shut down the emulator and delete the emulator'south data directory %LOCALAPPDATA%\CosmosDBEmulator.
Cosign connections when using emulator
As with Azure Creation DB in the cloud, every asking that yous brand against the Azure Cosmos DB Emulator must exist authenticated. The Azure Cosmos DB Emulator supports just secure communication via TLS. The Azure Cosmos DB Emulator supports a single fixed account and a well-known authentication fundamental for primary key authentication. This business relationship and fundamental are the only credentials permitted for use with the Azure Cosmos DB Emulator. They are:
Account proper name: localhost:<port> Account key: C2y6yDjf5/R+ob0N8A7Cgv30VRDJIWEHLM+4QDU5DE2nQ9nDuVTqobD4b8mGGyPMbIZnqyMsEcaGQy67XIw/Jw== Note
The primary primal supported by the Azure Cosmos DB Emulator is intended for apply but with the emulator. You cannot use your production Azure Cosmos DB business relationship and key with the Azure Creation DB Emulator.
Note
If yous have started the emulator with the /Cardinal option, so use the generated key instead of the default fundamental C2y6yDjf5/R+ob0N8A7Cgv30VRDJIWEHLM+4QDU5DE2nQ9nDuVTqobD4b8mGGyPMbIZnqyMsEcaGQy67XIw/Jw==. For more information nigh /Key selection, see Control-line tool reference.
Connect to different APIs with the emulator
SQL API
Once you have the Azure Cosmos DB Emulator running on your desktop, you can apply any supported Azure Creation DB SDK or the Azure Creation DB Residuum API to interact with the emulator. The Azure Creation DB Emulator besides includes a built-in information explorer that lets you create containers for SQL API or Azure Creation DB for Mongo DB API. By using the data explorer, you can view and edit items without writing whatsoever code.
// Connect to the Azure Cosmos DB Emulator running locally CosmosClient client = new CosmosClient( "https://localhost:8081", "C2y6yDjf5/R+ob0N8A7Cgv30VRDJIWEHLM+4QDU5DE2nQ9nDuVTqobD4b8mGGyPMbIZnqyMsEcaGQy67XIw/Jw=="); Azure Cosmos DB's API for MongoDB
One time you have the Azure Creation DB Emulator running on your desktop, you tin can utilise the Azure Creation DB's API for MongoDB to interact with the emulator. Start the emulator from command prompt as an administrator with "/EnableMongoDbEndpoint". Then use the following connectedness string to connect to the MongoDB API account:
mongodb://localhost:C2y6yDjf5/R+ob0N8A7Cgv30VRDJIWEHLM+4QDU5DE2nQ9nDuVTqobD4b8mGGyPMbIZnqyMsEcaGQy67XIw/Jw==@localhost:10255/admin?ssl=true Table API
Once you take the Azure Cosmos DB Emulator running on your desktop, you can use the Azure Cosmos DB Table API SDK to interact with the emulator. Start the emulator from command prompt as an administrator with "/EnableTableEndpoint". Adjacent run the following code to connect to the table API account:
using Microsoft.WindowsAzure.Storage; using Microsoft.WindowsAzure.Storage.Table; using CloudTable = Microsoft.WindowsAzure.Storage.Table.CloudTable; using CloudTableClient = Microsoft.WindowsAzure.Storage.Table.CloudTableClient; string connectionString = "DefaultEndpointsProtocol=http;AccountName=localhost;AccountKey=C2y6yDjf5/R+ob0N8A7Cgv30VRDJIWEHLM+4QDU5DE2nQ9nDuVTqobD4b8mGGyPMbIZnqyMsEcaGQy67XIw/Jw==;TableEndpoint=http://localhost:8902/;"; CloudStorageAccount account = CloudStorageAccount.Parse(connectionString); CloudTableClient tableClient = business relationship.CreateCloudTableClient(); CloudTable table = tableClient.GetTableReference("testtable"); table.CreateIfNotExists(); table.Execute(TableOperation.Insert(new DynamicTableEntity("partitionKey", "rowKey"))); Cassandra API
Offset emulator from an administrator command prompt with "/EnableCassandraEndpoint". Alternatively you lot can also set the environment variable AZURE_COSMOS_EMULATOR_CASSANDRA_ENDPOINT=true.
-
Install Python two.7
-
Install Cassandra CLI/CQLSH
-
Run the following commands in a regular control prompt window:
set Path=c:\Python27;%Path% cd /d C:\sdk\apache-cassandra-3.11.3\bin set SSL_VERSION=TLSv1_2 prepare SSL_VALIDATE=imitation cqlsh localhost 10350 -u localhost -p C2y6yDjf5/R+ob0N8A7Cgv30VRDJIWEHLM+4QDU5DE2nQ9nDuVTqobD4b8mGGyPMbIZnqyMsEcaGQy67XIw/Jw== --ssl -
In the CQLSH trounce, run the post-obit commands to connect to the Cassandra endpoint:
CREATE KEYSPACE MyKeySpace WITH replication = {'form':'MyClass', 'replication_factor': ane}; Draw keyspaces; USE mykeyspace; CREATE table table1(my_id int PRIMARY KEY, my_name text, my_desc text); INSERT into table1 (my_id, my_name, my_desc) values( 1, 'name1', 'description 1'); SELECT * from table1; EXIT
Gremlin API
Showtime emulator from an administrator control promptwith "/EnableGremlinEndpoint". Alternatively you can also ready the surround variable AZURE_COSMOS_EMULATOR_GREMLIN_ENDPOINT=truthful
-
Install apache-tinkerpop-gremlin-panel-3.3.iv.
-
From the emulator's data explorer create a database "db1" and a collection "coll1"; for the partition central, cull "/name"
-
Run the following commands in a regular command prompt window:
cd /d C:\sdk\apache-tinkerpop-gremlin-panel-iii.iii.iv-bin\apache-tinkerpop-gremlin-console-3.iii.iv re-create /y conf\remote.yaml conf\remote-localcompute.yaml notepad.exe conf\remote-localcompute.yaml hosts: [localhost] port: 8901 username: /dbs/db1/colls/coll1 countersign: C2y6yDjf5/R+ob0N8A7Cgv30VRDJIWEHLM+4QDU5DE2nQ9nDuVTqobD4b8mGGyPMbIZnqyMsEcaGQy67XIw/Jw== connectionPool: { enableSsl: false} serializer: { className: org.apache.tinkerpop.gremlin.driver.ser.GraphSONMessageSerializerV1d0, config: { serializeResultToString: true }} bin\gremlin.bat -
In the Gremlin vanquish, run the following commands to connect to the Gremlin endpoint:
:remote connect tinkerpop.server conf/remote-localcompute.yaml :remote panel :> thou.V() :> grand.addV('person1').belongings(id, 'i').property('name', 'somename1') :> g.addV('person2').holding(id, 'two').property('name', 'somename2') :> g.5()
Uninstall the local emulator
Use the following steps to uninstall the emulator:
-
Get out all the open instances of the local emulator by right-clicking the Azure Creation DB Emulator icon on the system tray, and and then select Exit. Information technology may take a minute for all instances to go out.
-
In the Windows search box, type Apps & features and select Apps & features (System settings) upshot.
-
In the list of apps, curlicue to the Azure Creation DB Emulator, select it, click Uninstall, then ostend and select Uninstall again.
Next steps
In this article, yous've learned how to utilize the local emulator for free local evolution. You can at present proceed to the next articles:
- Export the Azure Cosmos DB Emulator certificates for use with Coffee, Python, and Node.js apps
- Use command line parameters and PowerShell commands to control the emulator
- Debug issues with the emulator
Feedback
Source: https://docs.microsoft.com/en-us/azure/cosmos-db/local-emulator
Belum ada Komentar untuk "Can You Use Windows Remote Desktop as a Secure Crt Tool?"
Posting Komentar